Metallurgical Technologies, Inc.
Defect Investigation - Metal Testing

Using our advanced metal testing capabilities and vast experience in manufacturing technology, we identify the type and cause of metal defects.
During manufacturing, defects can be introduced at several stages of processing. Metallurgical Technologies, Inc. has the equipment, training and advanced metal testing capabilities to identify the individual step in the process in which the defect occurred and give recommendations to prevent future rejects, down time and profit loss.
With metal testing and other failure analysis methods, Metallurgical Technologies, Inc. determines whether your product failed due to defects or flaws produced in the manufacturing process, or if failure was caused during normal or abnormal usage.
A significant amount of metallurgical engineering is needed to successfully produce sound weldments in mechanical and structural applications.
Examples of Metal Testing and Defect Investigations:

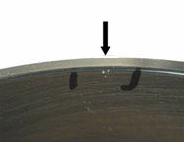
Close-up of flaws in a slide plate.

Low magnification view of the cross-section through the flaw.

High magnification view of cross-section showing nitriding white layer over the recess.
Metal Testing and Microscopic Evaluation - Slide Plate Example:
A slide plate was received for analysis of surface anomalies. Metal testing and microscopic evaluation results indicate the observed features are localized oxide-filled recesses in the as-forged surface introduced before the nitriding and heat-treating procedure. The recesses were not removed during rough machining prior to nitriding.

Close-up of pits in cylinder liner.

SEM image of a pit shows a “void like” coating flaw.

High magnification view of the cross-section through pits showing flaws in a thermal spray coating.
Metal Testing and Microscopic Evaluation - Cylinder Liner Example:
A cylinder liner was received for analysis to investigate the cause of pitting. Metal testing and scanning electron microstructure evaluation results indicate the pitting was in the wear resistant Ni-Si thermal spray coating. No indication of corrosion or penetration into the steel substrate was observed. Scanning electron microstructure evaluation of the cylinder liner pits revealed a smooth appearance in the bottom attributed to a void in the thermal spray coating.

Close-up view of a fine cracks (arrows) in a fillet weld.

A cross-section through the cracked weld reveals a Y-shaped crack in the center of the weld deposit.

A high magnification view of the cross-section identifies nickel plating lining the crack.
Metal Testing and Microscopic Evaluation - Weld Defect Example:
A steering arm was analyzed to investigate the fracture of several components in the fillet welds. A close-up view of the weld material shows a fine crack in the center of the weld. A cross-section through the weld reveals nickel plating lining the crack. This indicates that the crack was present prior to application of the plating.
A significant amount of metallurgical engineering is needed to successfully produce sound weldments in mechanical and structural applications.
Click here for more Product Details from
Metallurgical Technologies, Inc....